
In the second article of the series, we explore Google’s (human) Data Labelling Service for Advanced Image Labelling

Google Cloud AI Platform
Google AI Platform is a suite of services on Google Cloud specifically targeted at the building, deploying, and managing of machine learning models in the cloud.
If you are not familiar with Google AI Platform, you may want to read our first article in the series, where we present an overview of what’s available on the platform.
Google Cloud AI Platform: Hyper-Accessible AI & Machine Learning
What do we mean by labelling?
Labelling is a data science activity to support the training of supervised machine learning models. The term supervised is a direct reference to how these models rely on accurately labelled training data in order for them to learn.
Labelling images
Say we want to train an image classification model to identify if an image contains cats; we would need to start with a training set of images, with each image labelled “Has cats” or “No cats”. The model relies on these observed labels during training.
Labelling structured data
We are an insurance company and we want a classification model to classify the likelihood of a claim being paid out. Again, we need a training set, this time comprising of all the relevant information linked to a claim, together with a label “Paid Out” or “Not Paid Out”.
Labelling unstructured data
We are a news feed who wants to classify third-party news articles into the genre they apply to (business, entertainment, technology etc). In this example, our training set will comprise of many articles, complete with the text, labelled with the genre of that article.
Labelling audio
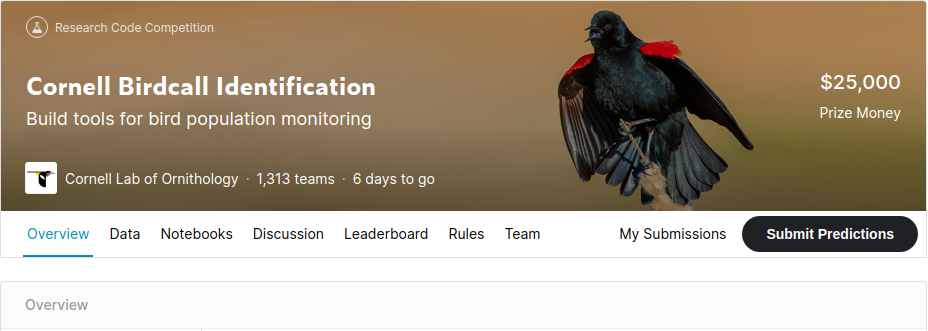
We are developing an app for bird watchers that can identify a species of bird from its call (think Shazam for birdsong!). For this, we need a training set of bird song audio files, each labelled with the bird it pertains to.
This example formed the foundation for a recent Data Science competition hosted by Kaggle :)
Labelling video
An online video service decides they want to serve adverts for cat food, each time a viewer streams a video containing cats. In this example, videos will be served to the model during training, labelled “Contains Cat” or “No Cat”.
Labelling and unsupervised models
Unsupervised models, such as a K-means clustering, do not require labelling because, in a sense, unsupervised models discover (i.e. learn) these labels for themselves.
Why labelling is important
When training supervised machine learning models, labelling is one of the first activities we carry out, and therefore, takes place very early on in the ML development lifecycle.
As a data science team, when training ML models we often revert back to this mantra:
“The accuracy of a machine learning model is only as good as it’s (training) data.”
Consider a recent example — we trained a collaborative-based recommendation engine to recommend social media posts for a global social media platform; one of the key activities here was to accurately score (label) each users’ engagement with a post. We scored the engagement on a 10 point scale, and if we got this scoring wrong — the end model would be seriously flawed.
So, accurately labelling your training set is crucial.
Labelling is not everything, however
It’s worth noting that accurately labelling your training set can still lead to problems. Here’s an example.
An image classification model was trained to detect wolves. The creators were perplexed when the algorithm incorrectly classified a German Shephard dog as a wolf. It turned out, the trained model was actually just looking for snow and trees in the image (which featured heavily in the training set).
This is a great TED Talk that cites this, and other examples.
Data Labelling on Google Cloud
Google’s Data Labelling Service provides access to human labellers to generate highly accurate labels for training data.
Currently in public-beta, the service formed part of the original AI Platform launch in April 2019.
The labelling service currently supports 3 media types:
1. Images
2. Video (we will cover in part 2 of this series)
3. Free-text (we will cover in part 3 of this series)
We will now explore image labelling, including an easy to follow, technical walkthrough.
1. Image labelling
Image labelling is the most common use-case we come across in our client projects. The service covers a good range of image labelling tasks:
Classification
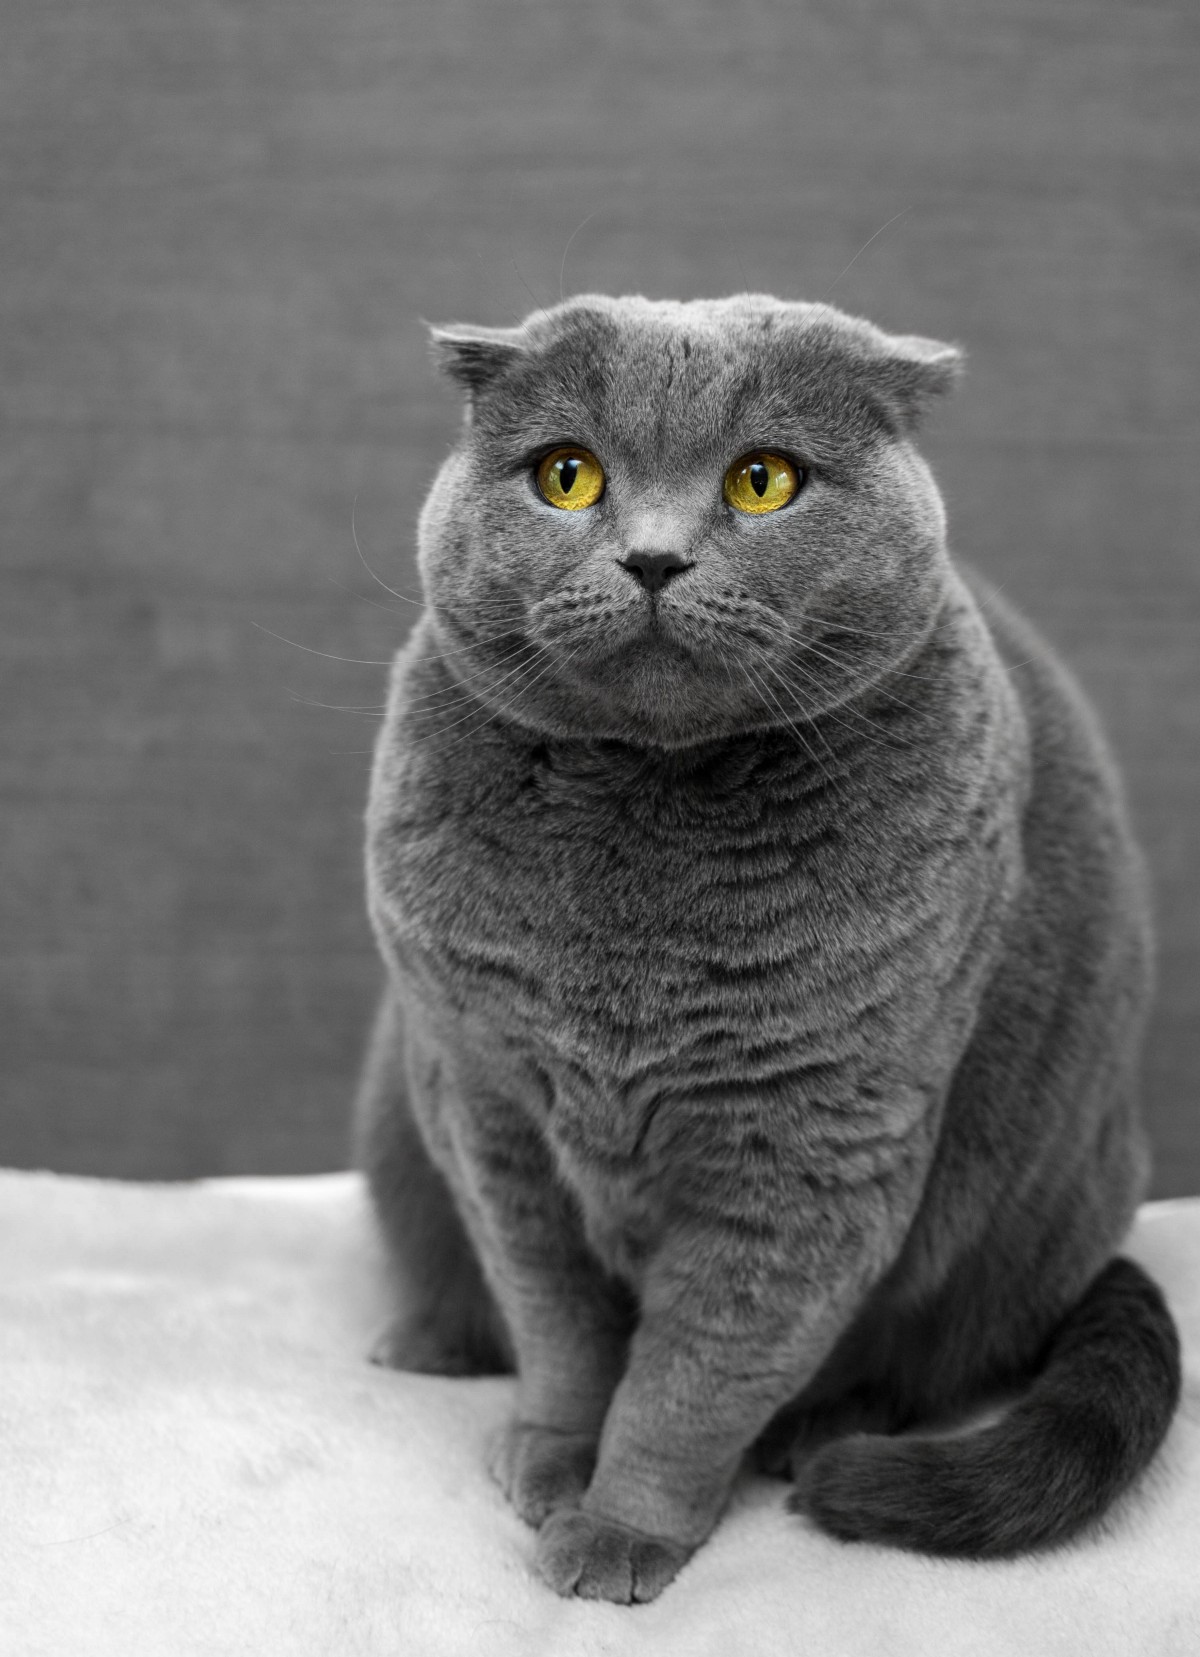 Label: "Contains Cat"
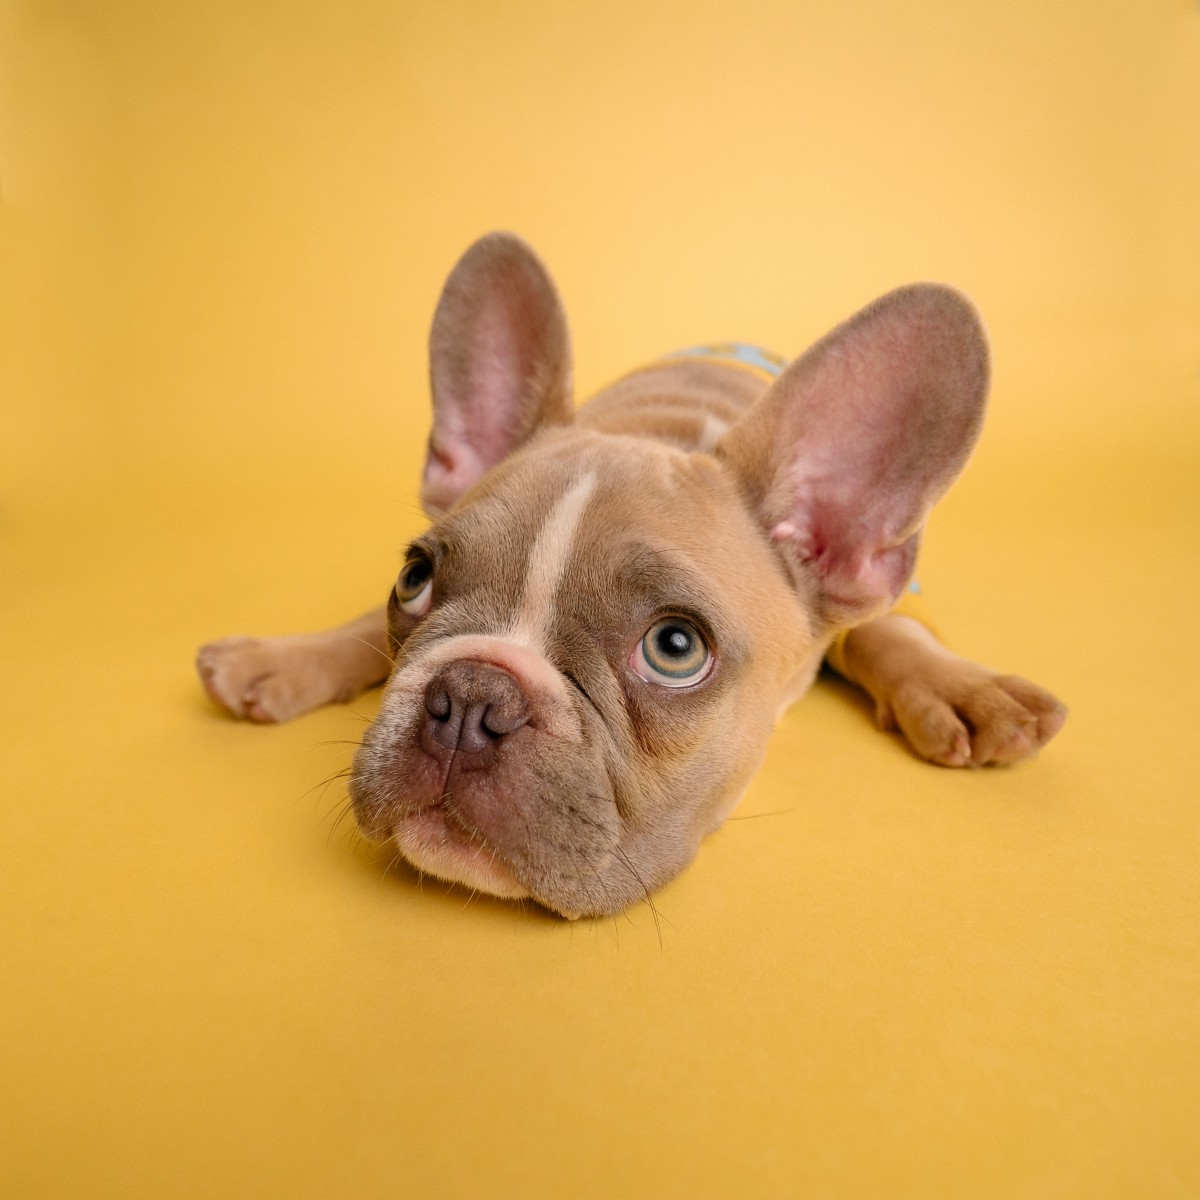 Label: "No Cat"
Image classification is the simplest to do, and a good place to start if you are using the service for the first time. I’ll use the above two images as an example of how easy it is.
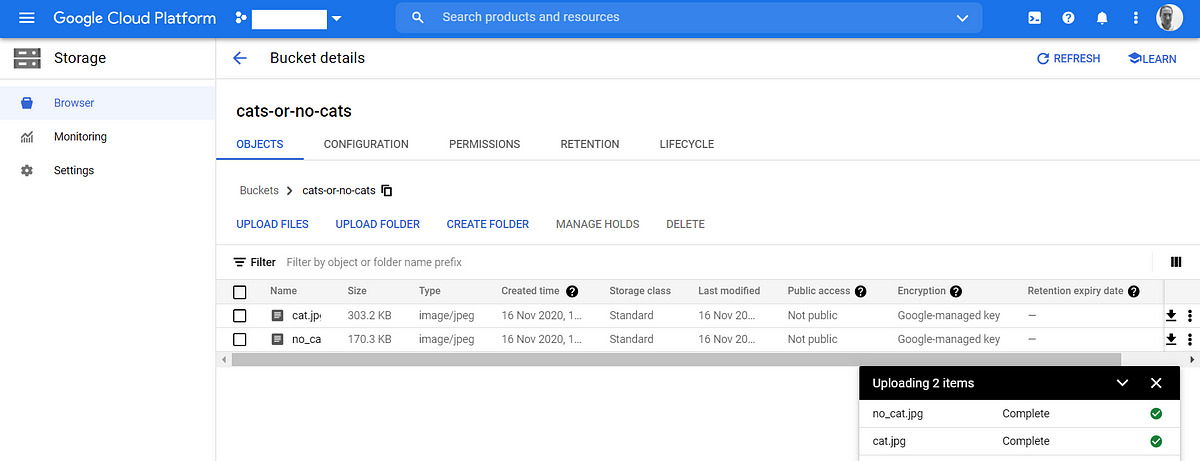
- First, upload your images to be labelled to a Google Cloud Storage bucket. Here, you can see the above images uploaded to a bucket called cats-or-no-cats.
Tip: This applies to any image labelling. Make sure your training images are as close as possible to the images the model will be predicting on. For example, think about resolution, colour/black and white, avoid commonalities in backgrounds (as in our wolf example earlier) that can confuse the model.
2. Next you need to create a .CSV file that contains the URIs to your images in your GCS bucket. So, in my example, my CSV just contains two lines:
gs://cats-or-no-cats/cat.jpg
gs://cats-or-no-cats/no_cat.jpg
Upload this .CSV file to the same bucket that contains your image files.
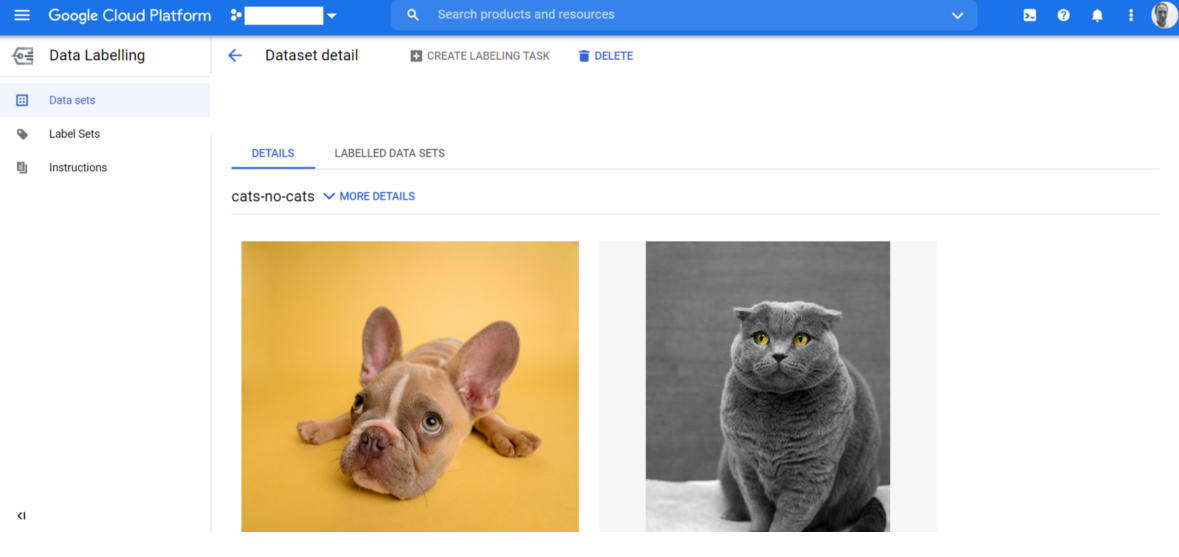
3. Next we need to create data labelling dataset. This dataset is simply a resource that the human labellers will refer to for your lablleing request. It contains your images, image .CSV file and your instructions (I’ll cover instructions shortly).
To create a dataset, first, navigate to the Data Labelling Service UI in the Google Cloud console. You should see a screen like this (enable the API if you are prompted).

Google Data Labelling Service in the Goolge Cloud Console
Click the CREATE button. Then, enter the details of your new dataset in the panel, shown below. Note I have to choose the CSV file in my cats-or-no-cats GCS bucket. Finally, click CREATE.
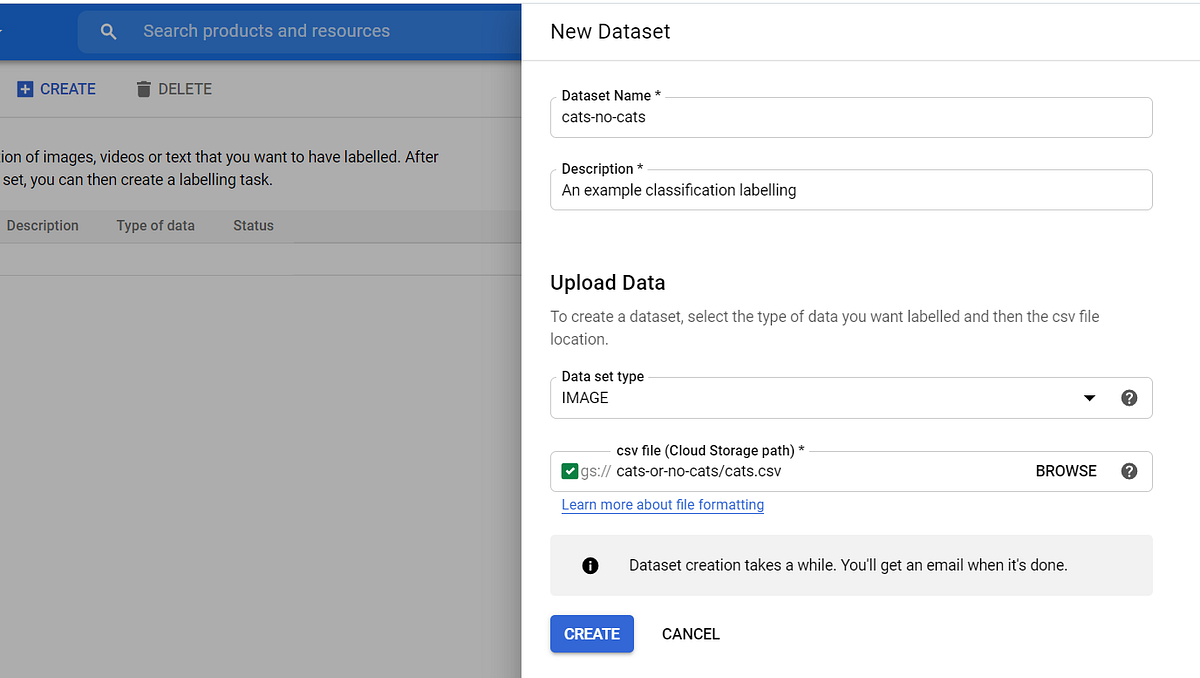
I now see my dataset with both of my images imported. Google documentation states this step takes approximately 10 minutes per 10,000 images uploaded.

My new dataset, ready for labelling
4. Next we create a label set, to define the label options we want the human labels to label our images with. In our example, we need two labels: “Cat” and “No Cat”.
To do this, from the Data Labelling UI click Label Sets from the menu on the left and then click CREATE at the top of the screen. Then, in the panel on the right, simply define your labels. Here are mine:
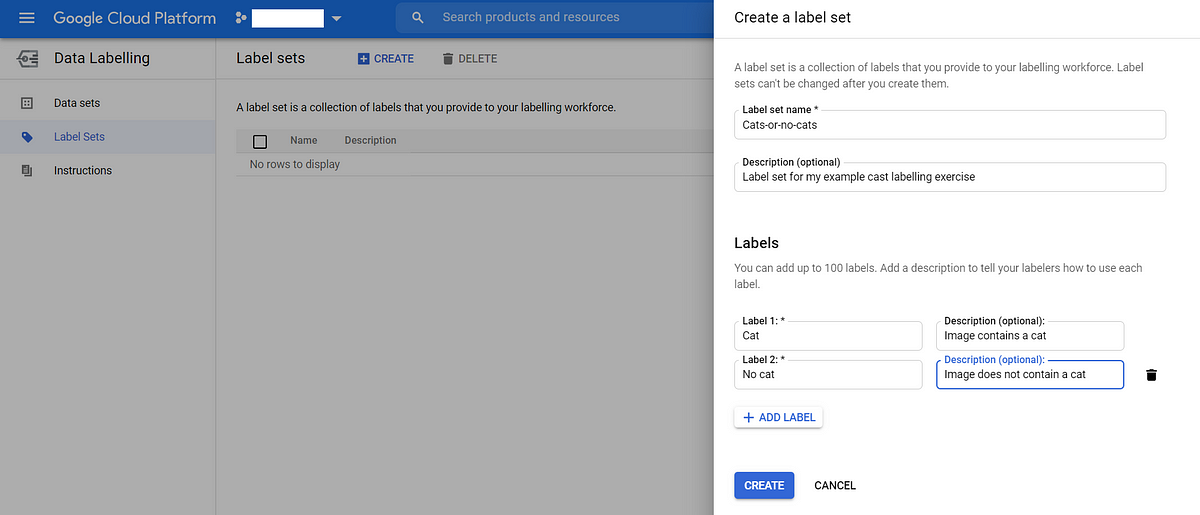
Defining your label sets
Tip #1. We always include a clear, unambiguous description with each label. Labellers will see these, and therefore these supplement your instructions!Tip Tip #2. For multi-classifcation use-cases (such as cats or dogs) we always include a label for “Both” (image has a cat and dog) and “None” (image has no cats or dogs). As well as, of course, “Cat” and “Dog” :)
5. The penultimate step is to create an instruction document. This is a PDF document that helps human labellers to understand what you want them to label. Now, for our classification task this is really simple and just requires a few example images (positive and negative) under each of our labels.
Google has a lot of detailed guidance on writing good instruction documents. We would recommend reading this, as if these instructions aren’t clear, your labellers may not do what you want them to do!
Once your PDF document is ready, upload it to your GCS bucket that contains your images and .CSV file. Next, click Instructions in the UI and in the panel on the right just navigate to your instructions document. Here’s what mine looks like:
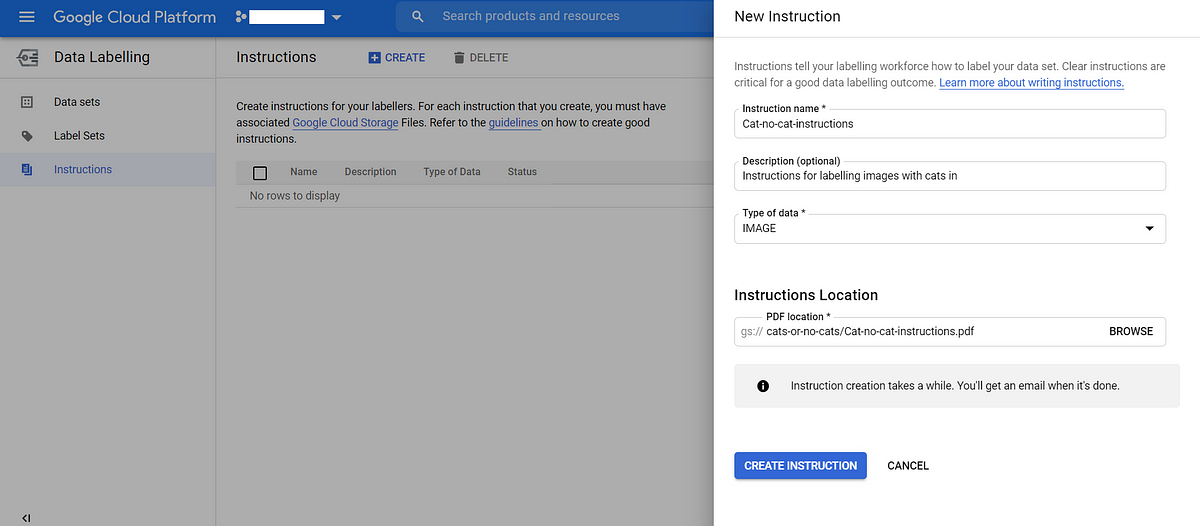
Uploading instructions for human labellers to help understand your task
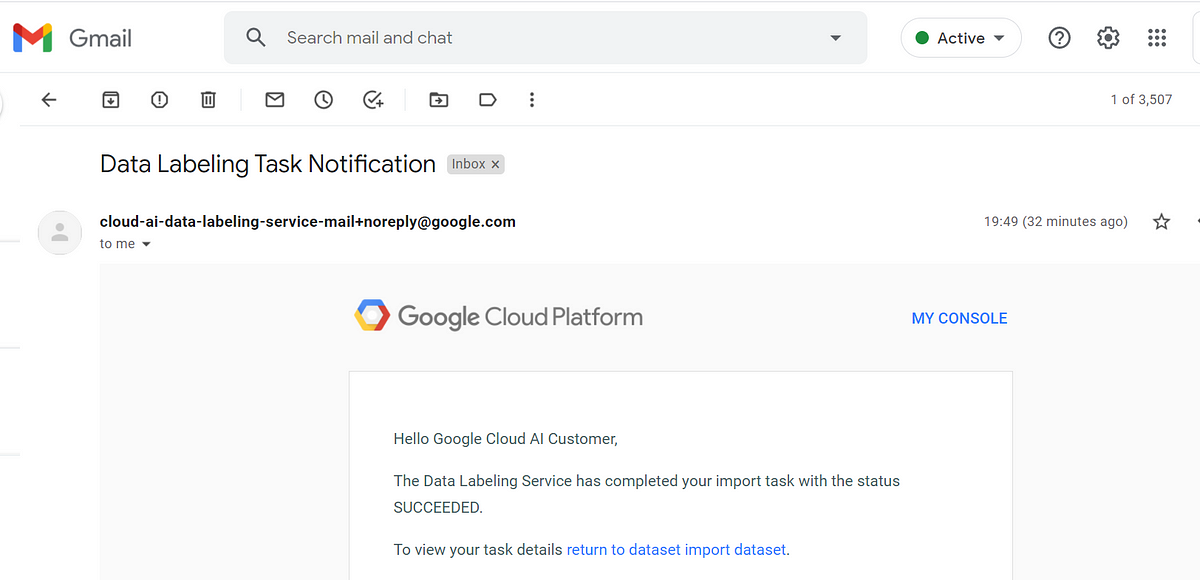
Click CREATE INSTRUCTIONS and wait for an email confirmation before continuing. Here’s my email (it usually only takes a few seconds).
My instructions are ready!
6. We are now ready to submit our labelling task! This is really straightforward — navigate to your dataset (see step 3) and click on the dataset name. You will see your dataset contents. Here are mine:
My dataset, ready for labelling
Click on CREATE LABELLING TASK at the top. In the panel that’s displayed enter:
- Enter a name for the annotated dataset (this is the dataset that will contain your human labelled images). Add a description too.
- From the objective dropdown, I choose Classification.
- From the label sets dropdown, I choose my Cats-or-no-cats label set.
- From the instructions dropdown, I choose my instructions PDF from my GCS bucket.
- Next, I choose how many people I want to review the labelling of each image. The default is one, which we typically choose. However, if your tasks demand extra rigour you can increase this to three or five.
- Lastly, accept the terms and conditions and click Create.
Congratulations! Your images will now be labelled by skilled human labellers. Pretty cool, hey?
Reviewing your labelled images
Once the labelling process is complete, you will receive an email confirmation. To review your labelled images, first, navigate to your dataset. Here is mine:

My dataset, labelled and ready for review
Click on the LABELLED DATA SETS link and you will see your labelled images. Exporting labelled images is a really useful feature, especially if your image training set is large. Options are to exports as a CSV or json file. To export your images:
- From the LABELLED DATA SETS page click EXPORT
- In the dialogue that appears, select a target GCS folder and the format (we usually choose CSV).
Tip: Both CSV and json exports can easily be viewed in BigQuery (via a federated external table) for further analysis.
Bounding box labelling
In bounding box, we want to label a particular feature of an image using a rectangular box. For example, as an extension of our Cats-or-no-cats example, we may choose to train a second model that can detect the position of a cats face within an image.
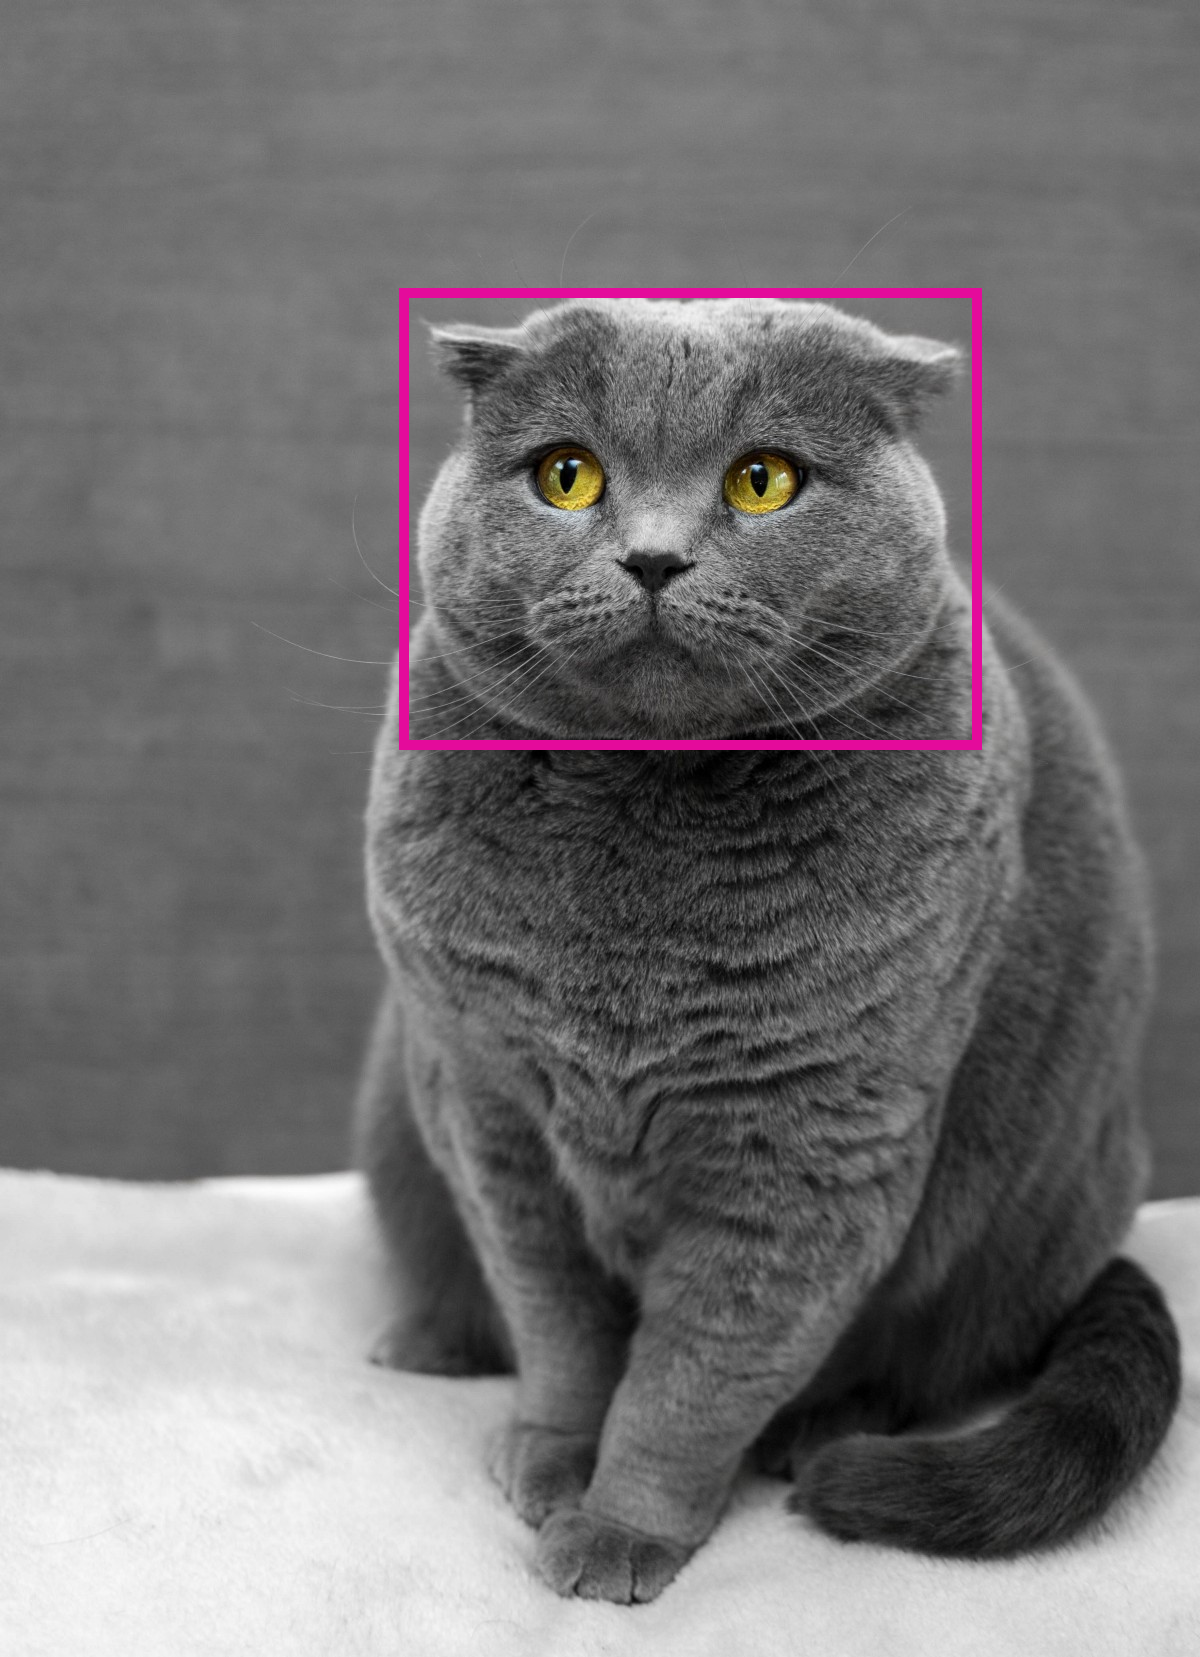
Bounding Box to detect the location of a cats face in an image
Tip. Pay close attention to your instructions document and make sure it’s really clear to labellers what you want (and don’t want) boxed in your images.
Oriented bounding box labelling
This is similar to the bounding box task, with the only difference being the boxes can be orientated (angled). We haven't come across this in the field, but this paper has some good examples relating to the identification of cars in aerial photography.
Bounded polygon labelling
This is useful if more precision is needed in object detection than bounded box. In this task, human labellers will label an image with closed polygons (comprising of a series of co-ordinates).
Let’s say we want our cat to be bounded by a polygon. Here’s what the labelled image might look like:
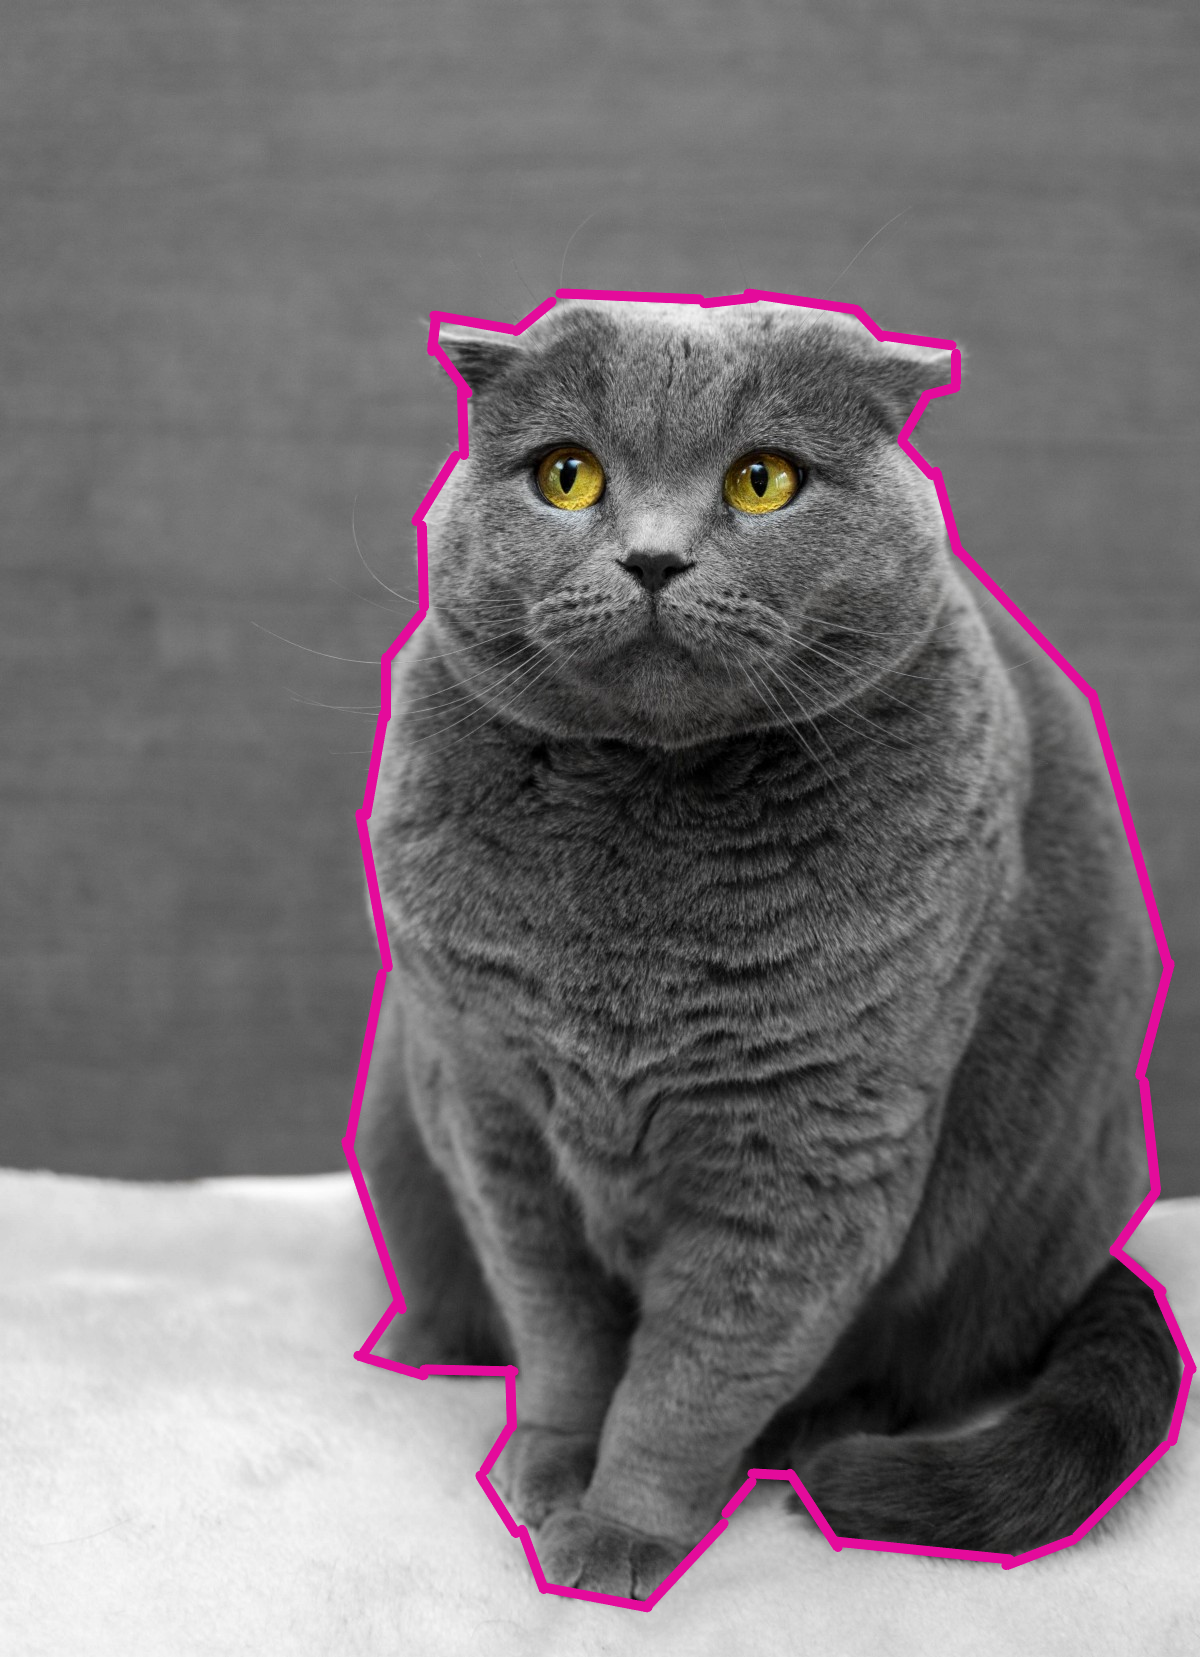
Bounded polygon image labelling
Polyline labelling
Polyline is similar to Bounded Polygon, with the exception the polygon does not need to be closed. This is often used for labelling roads in images, but if we continue our cat example, we could use a polyline to mark the cat’s mouth (perhaps we want to analyze if a cat is happy!).
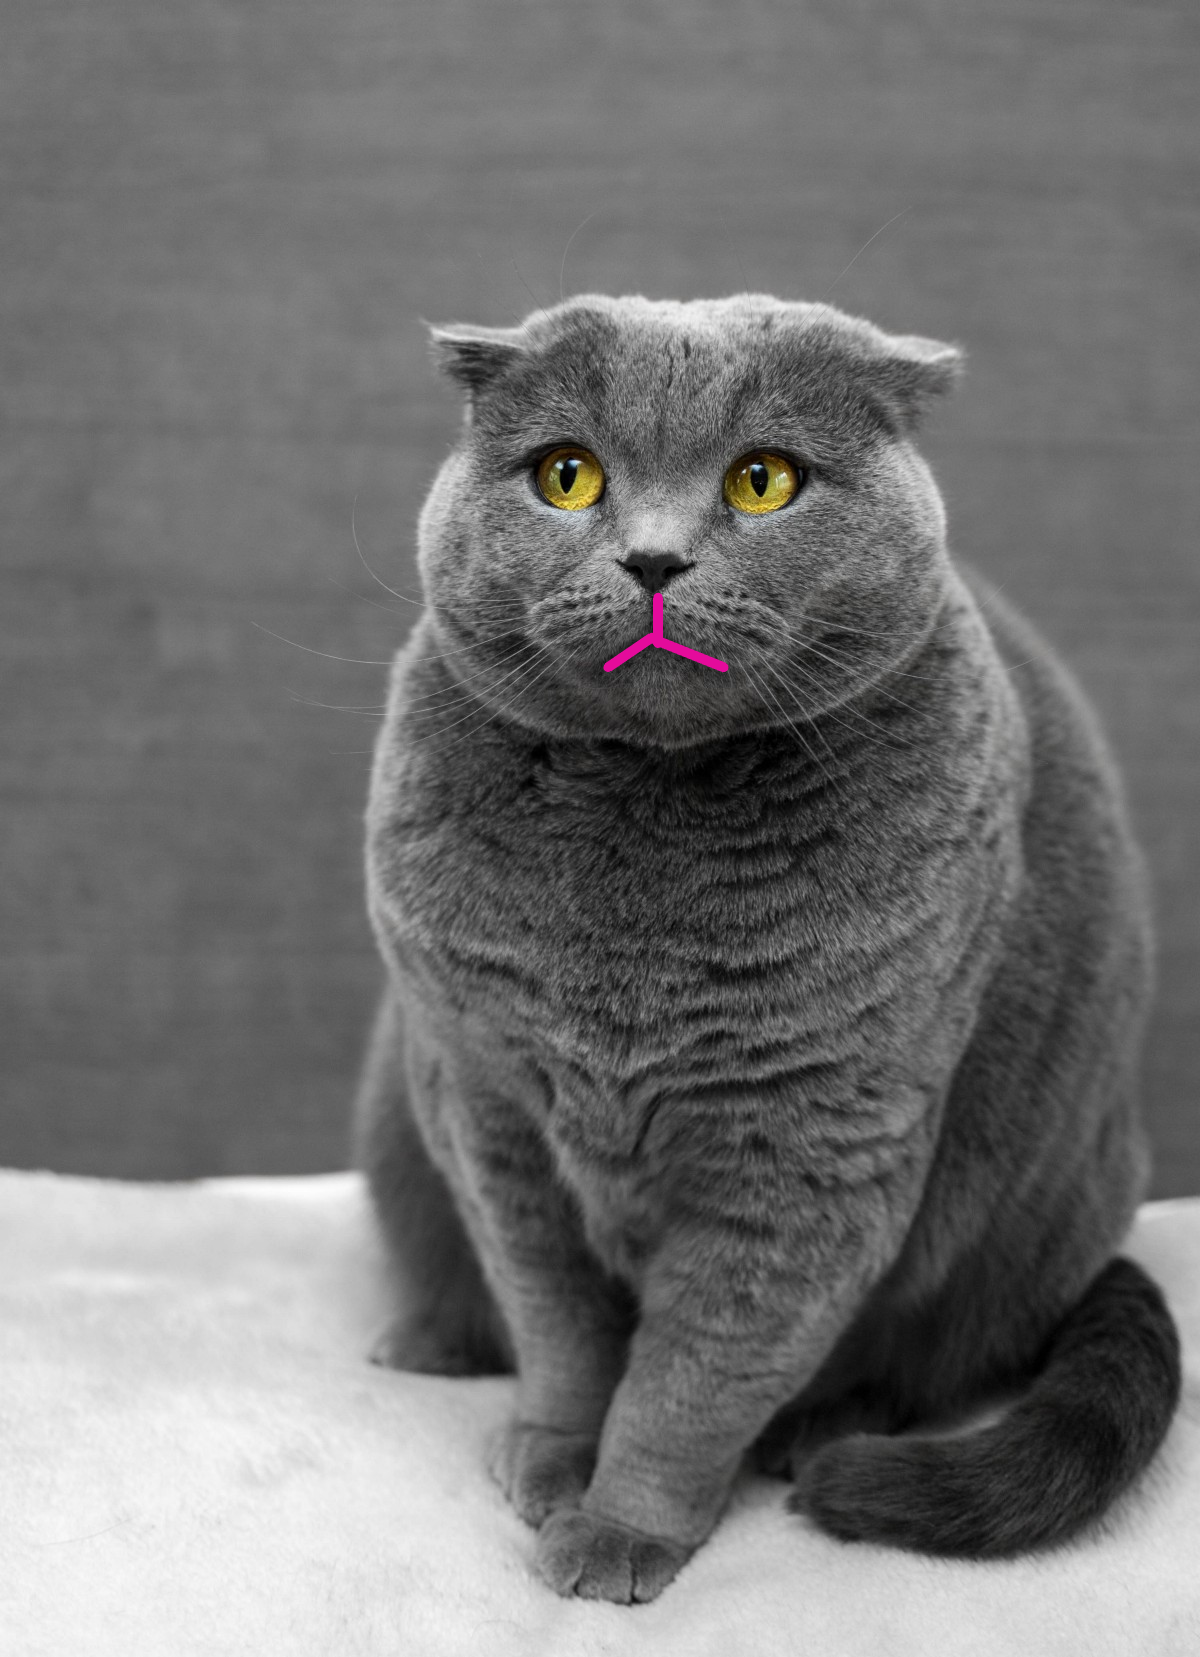
Polyline labelling of a cat’s mouth
Image Segmentation labelling
This form of labelling splits an image into a series of segments, each labelled with a colour. It’s frequently used in driverless car AI, where a street scene must be separated into different segments (road, pavement, cars, buildings, sky, etc).
In our example, we simply use this to label segments comprising cats.
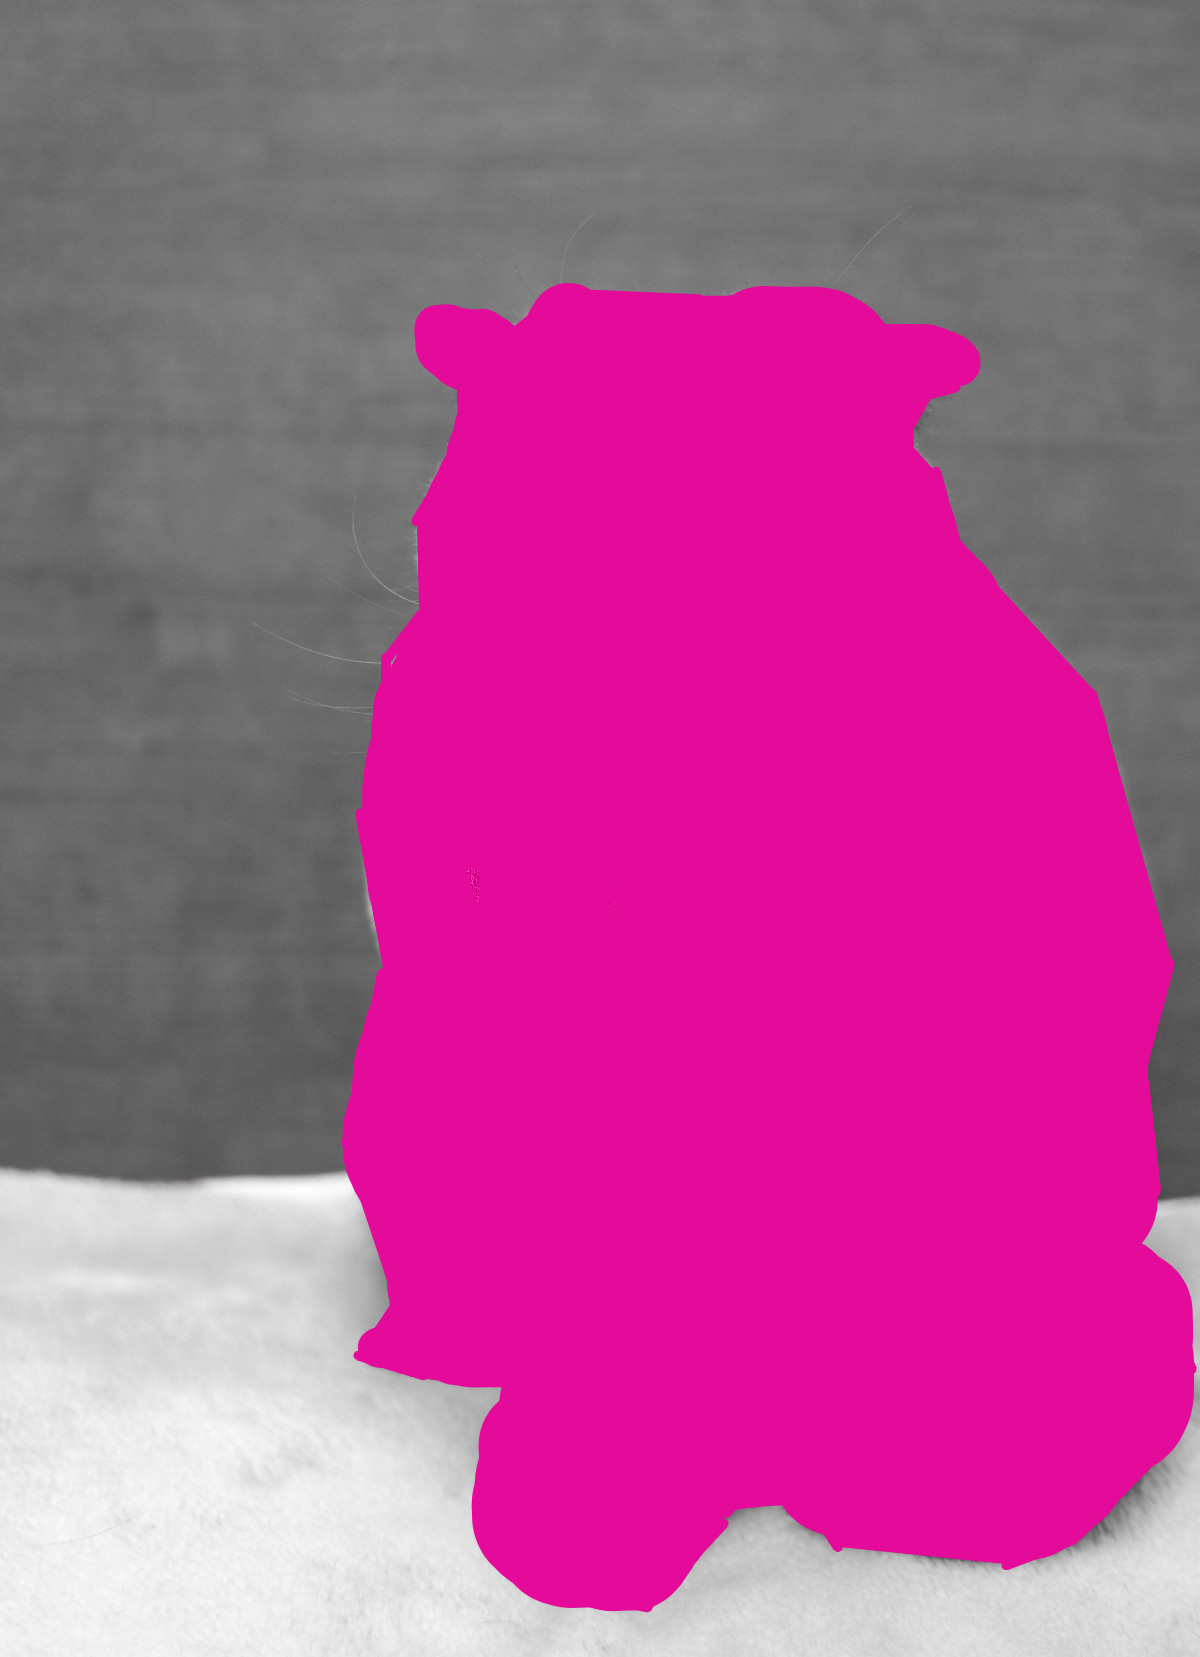
Image Segmentation labelling
How much does it cost?
Pricing is documented really well in the Google Cloud documentation. This describes the overall pricing structure:
“Prices for the service are computed based on:
1. The type of labeling task.
2. The number of annotation units generated.”
So, if we look at our classification example I used earlier. Here is the definition of annotation units for classification tasks:
For an image classification task, units are determined by the label set size (for labeling quality concern, every 20 labels is a problem set and a price unit) and the number of human labelers. The price for single-label and multi-label classification is the same. For example, for an image, the label set size is 22, the number of human labelers is 3, this image will count for 2 * 3 = 6 units.
In our example, our label set size was 2; “Cat” and “No Cat”.
As a price unit covers up to 20 labels, ours constitutes 1 unit.
We left the number of human labellers at the default of 1.
Therefore, our labelling task is priced at 2 units (1 unit per image).
At the time of writing, image classification is priced at $35 per 1,000 units for the first 50,000 units per month, and $25 for every 1,000 units thereafter.
These costs are shown below.
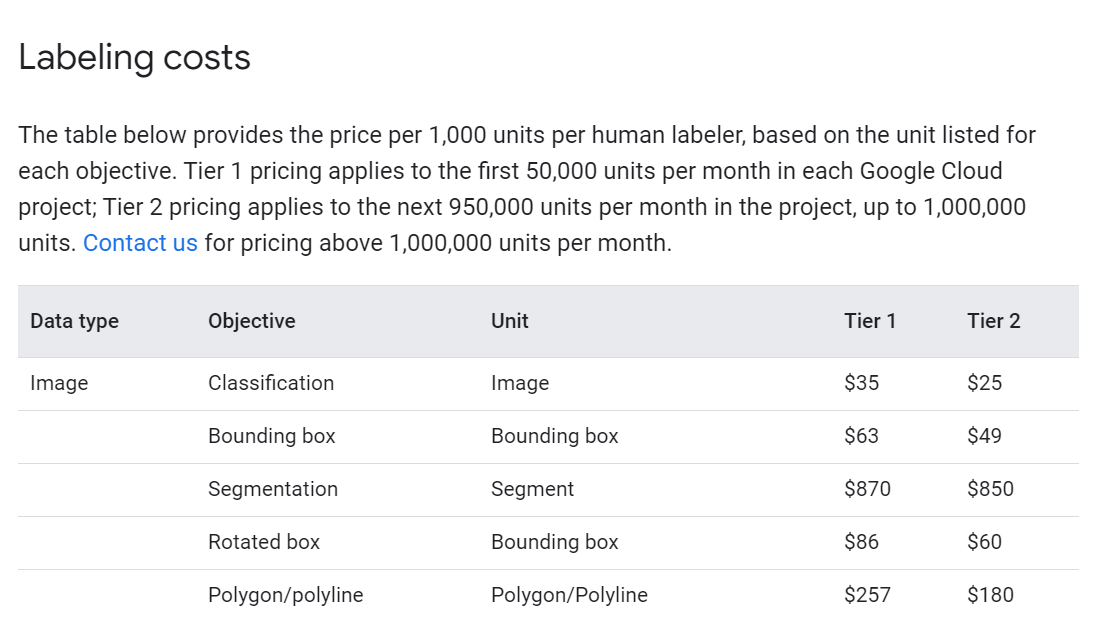
Image Labelling costs
This is equivalent to 3.5 cents per image, reducing to 2.5 cents.
My image classification example would therefore cost 7 cents
Next steps
1. In Part 2, we will explore the Data Labelling service for video labelling
2. Read the Google Cloud Data Labelling documentation
3. Learn more about Ancoris Data, Analytics & AI